Ar152 Fans in a Mobo That Doesnt Have Rgb Header
Today we're setting up some ARGB fans with a motherboard that doesn't receive any RGB operating theater ARGB headers to see what's involved. We'll also be controlling these via software, so we can revel all the customisation options that come with the latest addressable RGB kits!
For this we're exit to be exploitation our favourite Tank Master ARGB 3x Fan Kitas it has a rooter controller included, before we get stuck into the install we'll just fill a quick deal what comes inside the box.
– A-RGB LED Small Controller
– SATA &A; Thermal Espial Cable
– 1 to 3 A-RGB Cable &A; Telegraph to sync MB
– 1 to 3 Fan Power Cable Splitter
– Thermal Sensor
– 3x 120mm A-RGB Fans
– 12 Rooter Screws
– Substance abuser Non-automatic + Warrantee Information Booklet

OK let's get into it! (insert great pic from manual)
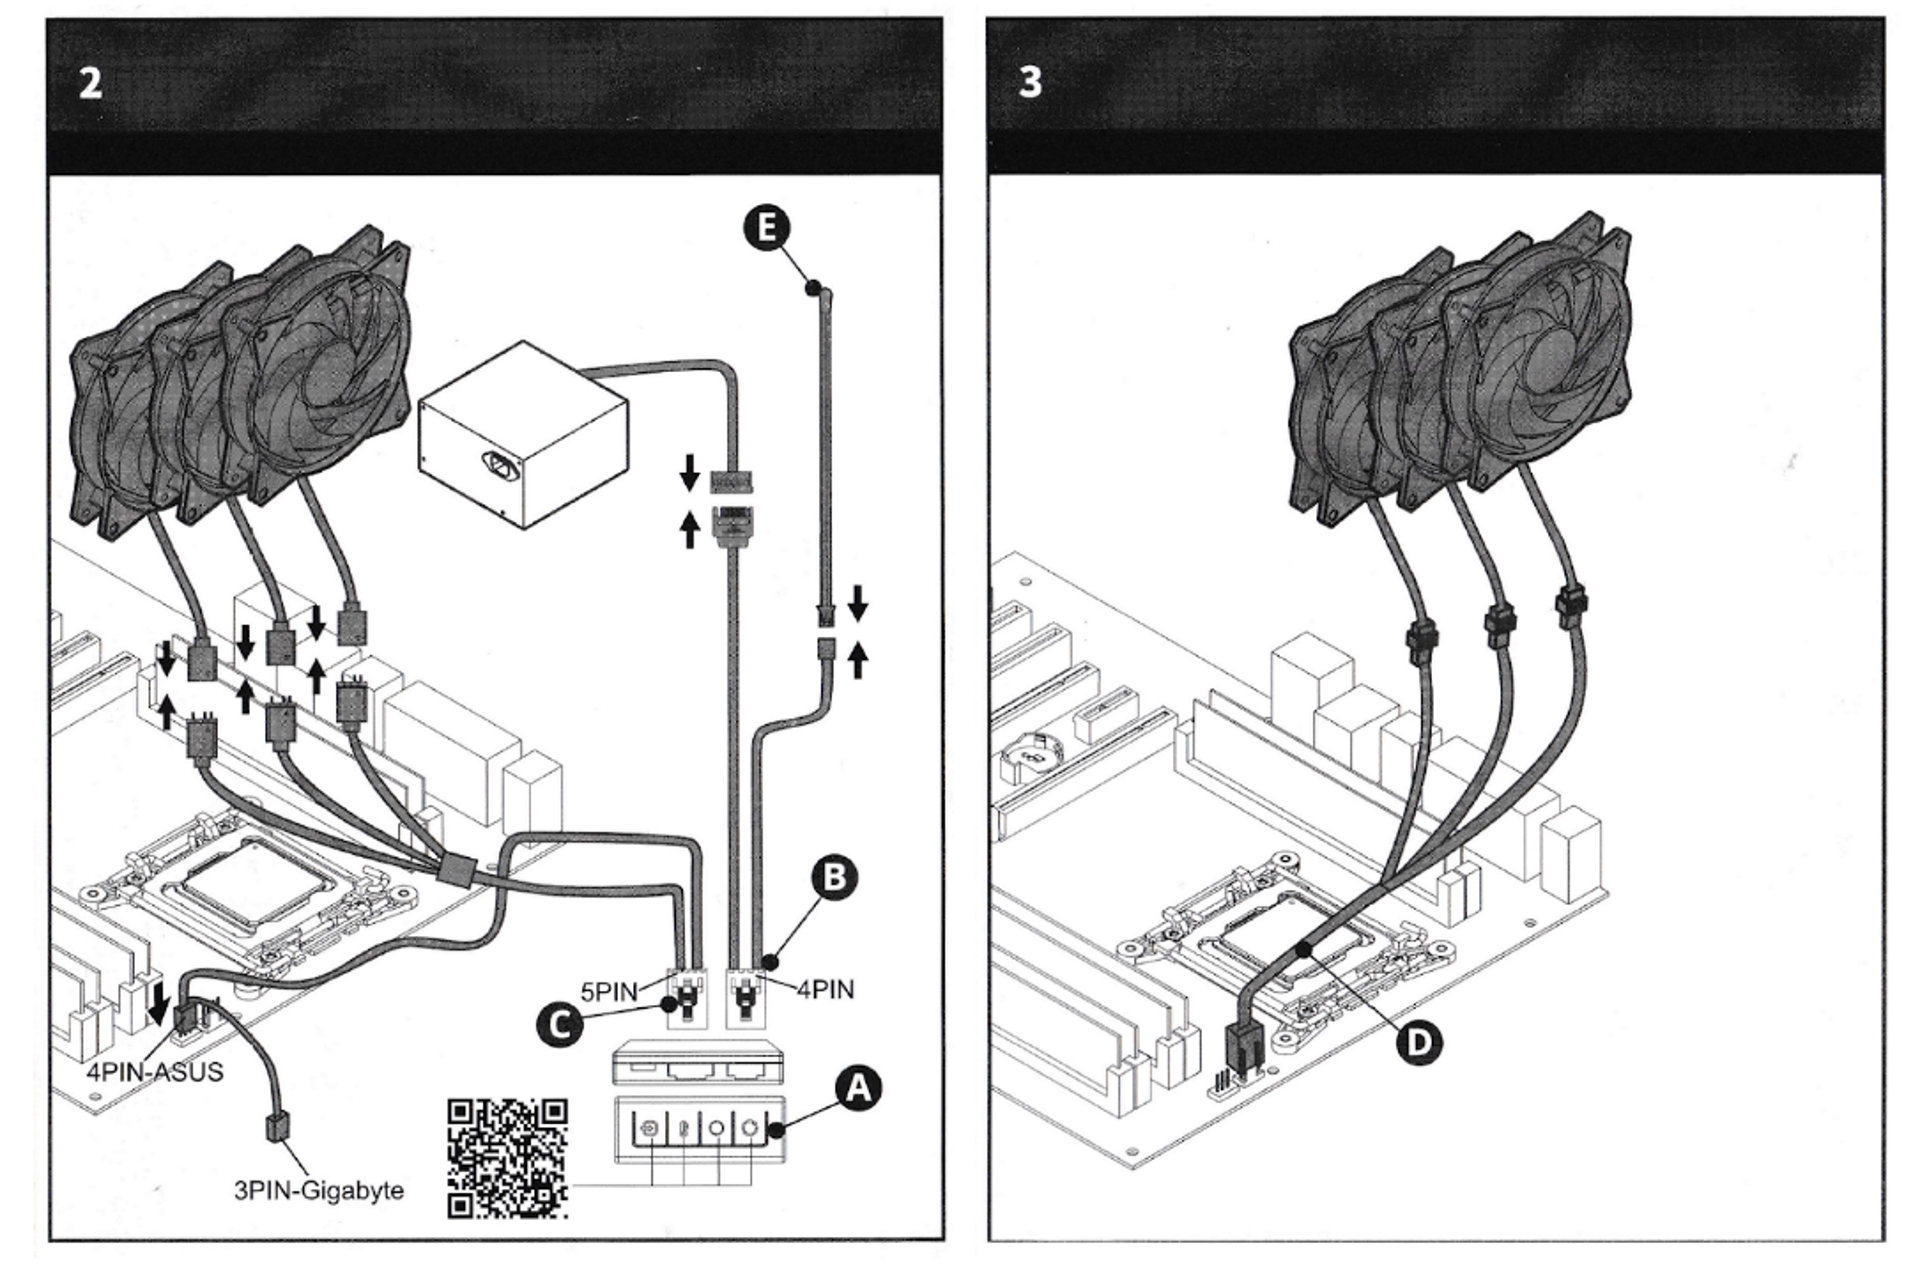
First, we connected the ARGB Wire (it's got 3 pins, shown below) and the Fan Power Cable Rail-splitter (ignoring the Asus and Gigabyte connectors) to the congruous connectors on the fan cables. The ARGB and Fan Power connector types are clearly well-marked on the cables with white tags. The green arrows below show the little triangles that match up.

We and then connected the ARGB Cablegram 5 pin connector and the SATA & Thermal Detection Cable 4 pin connector to the controller.

Finally, we connected the SATA & Thermal Detection Cable into the Thermal Sensor and SATA power connector from the PSU.

When turning on the PC we had success, the fans were running fine and the LEDs afire up – competent to be controlled through with the buttons on the ARGB controller.
The ARGB accountant is easy to mount into the case as information technology is magnetic, and with you'll have a few effects and the beautiful ARGB rainbow way
The Manual that comes in the boxful states you butt download software on Ice chest Master's web site. This is a fairly well-off process but you'll need to get your own MicroUSB cable and internal USB Header adapter for it to seem topnotch unqualified 😛 (cowboy mode plugging the micro USB cable into a USB porthole on the outside of your PC work though)
In one case you've connected the Cooler Master ARGB controller via USB, steer to the CM Download foliate to catch up the latest (This will be newer than ones we've pictured below when we tested, which was v1.0.0.1)
Now, onto conjunctive the Fans and Controller direct the software 🙂
![]()

Here we opened finished the detected comptroller and so navigated to the configuration page.

One time happening the configuration page, we added the unique MasterFan ARGB option (indicated past the double electric light ikon) via the + symbolization. (The MasterLiquid options also work simply aren't really needed since the controller only has one port to control.)

This bequeath add the fan into the top left-give recession, next, we click on the white electric-light bulb icon of the added devotee.

So link that to the first controller port by clicking on the light electric light icon with the A1 next to information technology.

Sooner State, now that tricky bit is done, we can begin changing the LED modes and individual LED colours! Atomic number 3 we have our fans connected to the commencement port on our controller we can configure and customize through the overview tab.

From the overview lozenge, you hindquarters select the different patterns for the LEDs.

LED ON!
Ar152 Fans in a Mobo That Doesnt Have Rgb Header
Source: https://ggpc.co.nz/posts/good-rgb-installing-a-rgb-fans-with-a-non-rgb-motherboard/
Post a Comment for "Ar152 Fans in a Mobo That Doesnt Have Rgb Header"